Your shopping cart is empty!
MENU
Your shopping cart is empty!
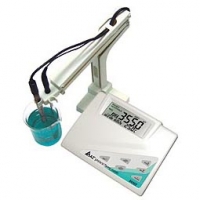 A properly calibrated pH meter is the key to getting an accurate pH reading of your sample. If you’re not sure whether you’re doing it right, here’s a step-by-step guide that can get you on the right track.
Allow time for warm up. Turn the pH meter on and allow it to warm up for about 30 minutes. However, since different manufacturers have different specifications, check the operating manual to know the recommended time for warm up.
Choose the right settings. After selecting the pH mode, make sure that the temperature is set at 24oC and the cal reads 100%.
Tidy up your electrodes. Rinse the electrode with deionized water and blot it with Kimwipes, Shurwipes or a piece of lint-free tissue to remove excess moisture.
Additional Tips:
Prepare your buffers. In calibrating a pH meter, you need to prepare a neutral buffer (pH 7) and an acidic and/or basic buffer with pH near the expected sample pH. Always consider the pH range of the samples you are measuring and make sure your calibration points bracket the pH range of your sample. This means that if you measure acidic samples, you need to use a second buffer with a lower pH when calibrating your pH meter. Alternatively, use a second buffer with a higher pH if you measure basic samples.
Additional Tips:
Start calibrating. Place the electrode in the neutral buffer and let it sit there for about 1 to 2 minutes. After the pH reading has stabilized, set the display to read ‘7’ by adjusting cal 1. Rinse your electrode with deionized water and remove excess moisture with Kimwipes or Shurwipes.
Place the electrode in the second buffer. Again, allow the display to stabilize and press the measure button to begin reading the pH. Remove the electrode from the buffer, rinse with deionized water and gently pat dry using Kimwipes or Shurwipes.
Now that you have properly calibrated your pH meter, place the electrode in the sample, press the measure button and let it sit there for about 1 to 2 minutes to get an accurate reading.
pH Meter Not Properly Calibrated? So What?
A lot of things can go wrong if you fail to calibrate your equipment properly. Since pH meters and electrodes normally drift from their calibrated settings, the reliability of measurements will be greatly affected and you will most likely get inaccurate results if you don’t calibrate it on a regular basis.

Leave a Comment